


Introduction
The goal is to present my concept of a UNIX network security architecture based on the Internet connectivity model and Firewall approach to implementing security. This defines several layers of a firewall, which depict the layers of vulnerability. This also provides some subjective comments on some of the most widely known tools and methods available to protect UNIX networks today, plus a brief discussion of the threat and the risk.
The list of tools and methods that I present in this were chosen loosely on the basis of the following:
(a) My attempt to find at least one, maybe several examples of a tool or method designed to address a part of the architectural model (some duplication or overlap is accepted);
(b) my preference to discuss tools that are well-known and/or part of the public domain ; and
(c) I hoped to find tools that had a recent paper written by the tools' author, for the reader to use as detailed reference beyond the scope of this document.
Nothing in this paper should be construed as a product endorsement. I apologize in advance to the authors of these tools and methods; since I am only presenting a brief overview, I cannot do justice to a comprehensive description of them.
Risk, Threat, and Vulnerability
This section presents a general overview of the risk and the threat to the security of your network. These are general statements that apply to almost every network. A complete analysis of your network's risk, threat, and vulnerability should be done in order to assess in detail the requirements of your own network.
Risk
The risk is the possibility that an intruder may be successful in attempting to access your local-area network via your wide-area network connectivity. There are many possible effects of such an occurence. In general, the possibility exists for someone to:
READ ACCESS. Read or copy information from
your network.
WRITE ACCESS. Write to or destroy data on
your network (including planting trojan
horses, viruses, and back-doors).
DENIAL OF SERVICE. Deny normal use of your
network resources by consuming all of your
bandwidth, CPU, or memory.
Threat
The threat is anyone with the motivation to attempt to gain unauthorized access to your network or anyone with authorized access to your network. Therefore it is possible that the threat can be anyone. Your vulnerability to the threat depends on several factors such as:
MOTIVATION. How useful access to or
destruction of your network might be to
someone.
TRUST. How well you can trust your authorized
users and/or how well trained are your users
to understand what is acceptable use of the
network and what is not acceptable use,
including the consequences of unacceptable
use.
Vulnerability
Vulnerability essentially is a definition of how well protected your network is from someone outside of your network that attempts to gain access to it; and how well protected your network is from someone within your network intentionally or accidently giving away access or otherwise damaging the network.
Motivation and Trust (see Threat) are two parts of this concern that you will need to assess in your own internal audit of security requirements and policy, later I will describe some references that are available to help you start this process.
UNIX Network Security Architecture
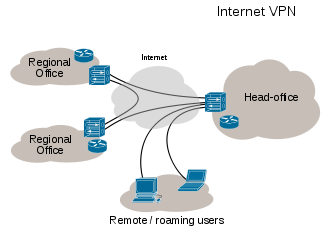
For each of the layers in the UNIX Network Security Architecture (UNIX/NSA) model below, there is a subsection that follows that gives a brief description of that layer and some of the most widely used tools and methods for implementing security controls. I am using the ISO/OSI style of model since most people in the UNIX community are familiar with it. This architecture is specifically based on UNIX Internet connectivity, but it is probably general enough to apply to overall security of any network methodology. One could argue that this model applies to network connectivity in general, with or without the specific focus of UNIX network security.
Layer Name Functional Description
LAYER 7 ;POLICY; POLICY DEFINITION AND DIRECTIVES
LAYER 6 ;PERSONNEL ;PEOPLE WHO USE EQUIPMENT AND DATA
LAYER 5 ;LAN ;COMPUTER EQUIPMENT AND DATA ASSETS
LAYER 4; INTERNAL-DEMARK ;CONCENTRATOR - INTERNAL CONNECT
LAYER 3 ;GATEWAY ;FUNCTIONS FOR OSI 7, 6, 5, 4
LAYER 2 PACKET-FILTER; FUNCTIONS FOR OSI 3, 2, 1
LAYER 1 EXTERNAL-DEMARK ;PUBLIC ACCESS - EXTERNAL CONNECT
The specific aim of this model is to illustrate the relationship between the various high and low level functions that collectively comprise a complete security program for wide-area network connectivity. They are layered in this way to depict
(a) the FIREWALL method of implementing access controls, and
(b) the overall transitive effect of the various layers upon the adjacent layers, lower layers, and the collective model.
The following is a general description of the layers and the nature of the relationship between them. Note that there may be some overlap between the definitions of the various levels, this is most likely between the different layers of the FIREWALL itself (layers 2 and 3).
The highest layer [ 7 - POLICY ] is the umbrella that the entirety of your security program is defined in. It is this function that defines the policies of the organization, including the high level definition of acceptable risk down to the low level directive of what and how to implement equipment and procedures at the lower layers. Without a complete, effective, and implemented policy, your security program cannot be complete.
The next layer [ 6 - PERSONNEL ] defines yet another veil within the bigger umbrella covered by layer 7. The people that install, operate, maintain, use, and can have or do otherwise have access to your network (one way or another) are all part of this layer. This can include people that are not in your organization, that you may not have any administrative control over. Your policy regarding personnel should reflect what your expectations are from your overall security program. Once everything is defined, it is imperitive that personnel are trained and are otherwise informed of your policy, including what is and is not considered acceptable use of the system.
The local-area network layer [ 5 - LAN ] defines the equipment and data assets that your security program is there to protect. It also includes some of the monitor and control procedures used to implement part of your security policy. This is the layer at which your security program starts to become automated electronically, within the LAN assets themselves.
The internal demarkation layer [ 4 - INTERNAL DEMARK ] defines the equipment and the point at which you physically connect the LAN to the FIREWALL that provides the buffer zone between your local- area network (LAN) and your wide-area network (WAN) connectivity. This can take many forms such as a network concentrator that homes both a network interface for the FIREWALL and a network interface for the LAN segment. In this case, the concentrator is the internal demarkation point. The minimum requirement for this layer is that you have a single point of disconnect if the need should arise for you to spontaneosly separate your LAN from your WAN for any reason.
The embedded UNIX gateway layer [ 3 - GATEWAY ] defines the entire platform that homes the network interface coming from your internal demark at layer 4 and the network interface going to your packet filtering router (or other connection equipment) at layer 3. The point of the embedded UNIX gateway is to provide FIREWALL services (as transparent to the user or application as possible) for all WAN services. What this really is must be defined in your policy (refer to layer 1) and illustrates how the upper layers overshadow or are transitive to the layers below. It is intended that the UNIX gateway (or server) at this layer will be dedicated to this role and not otherwise used to provide general network resources (other than the FIREWALL services such as proxy FTP, etc.). It is also used to implement monitor and control functions that provide FIREWALL support for the functions that are defined by the four upper ISO/OSI layers (1-Application, 2-Presentation, 3- Session, 4-Transport). Depending on how this and the device in layer 2 is implemented, some of this might be merely pass-thru to the next level. The configuration of layers 3 and 2 should collectively provide sufficient coverage of all 7 of the functions defined by the ISO/OSI model. This does not mean that your FIREWALL has to be capable of supporting everything possible that fits the OSI model. What this does mean is that your FIREWALL should be capable of supporting all of the functions of the OSI model that you have implemented on your LAN/WAN connectivity.
The packet filtering layer [ 2 - FILTER ] defines the platform that homes the network interface coming from your gateway in layer 3 and the network interface or other device such as synchronous or asynchronous serial communication between your FIREWALL and the WAN connectivity at layer 1. This layer should provide both your physical connectivity to layer 1 and the capability to filter inbound and outbound network datagrams (packets) based upon some sort of criteria (what this criteria needs to be is defined in your policy). This is typically done today by a commercial off-the- shelf intelligent router that has these capabilities, but there are other ways to implement this. Obviously there is OSI link-level activity going on at several layers in this model, not exclusively this layer. But, the point is that functionally, your security policy is implemented at this level to protect the overall link- level access to your LAN (or stated more generally; to separate your LAN from your WAN connectivity).
The external demarkation layer [ LAYER 1 ] defines the point at which you connect to a device, telephone circuit, or other media that you do not have direct control over within your organization. Your policy should address this for many reasons such as the nature and quality of the line or service itself and vulnerability to unauthorized access. At this point (or as part of layer 2) you may even deploy yet another device to perform point to point data link encryption. This is not likely to improve the quality of the line, but certainly can reduce your vulnerability to unauthorized access. You also need to be concerned about the dissemination of things at this level that are often considered miscellaneous, such as phone numbers or circuit IDs.
READ MORE - UNIX Network Security Architecture
The goal is to present my concept of a UNIX network security architecture based on the Internet connectivity model and Firewall approach to implementing security. This defines several layers of a firewall, which depict the layers of vulnerability. This also provides some subjective comments on some of the most widely known tools and methods available to protect UNIX networks today, plus a brief discussion of the threat and the risk.
The list of tools and methods that I present in this were chosen loosely on the basis of the following:
(a) My attempt to find at least one, maybe several examples of a tool or method designed to address a part of the architectural model (some duplication or overlap is accepted);
(b) my preference to discuss tools that are well-known and/or part of the public domain ; and
(c) I hoped to find tools that had a recent paper written by the tools' author, for the reader to use as detailed reference beyond the scope of this document.
Nothing in this paper should be construed as a product endorsement. I apologize in advance to the authors of these tools and methods; since I am only presenting a brief overview, I cannot do justice to a comprehensive description of them.
Risk, Threat, and Vulnerability
This section presents a general overview of the risk and the threat to the security of your network. These are general statements that apply to almost every network. A complete analysis of your network's risk, threat, and vulnerability should be done in order to assess in detail the requirements of your own network.
Risk
The risk is the possibility that an intruder may be successful in attempting to access your local-area network via your wide-area network connectivity. There are many possible effects of such an occurence. In general, the possibility exists for someone to:
READ ACCESS. Read or copy information from
your network.
WRITE ACCESS. Write to or destroy data on
your network (including planting trojan
horses, viruses, and back-doors).
DENIAL OF SERVICE. Deny normal use of your
network resources by consuming all of your
bandwidth, CPU, or memory.
Threat
The threat is anyone with the motivation to attempt to gain unauthorized access to your network or anyone with authorized access to your network. Therefore it is possible that the threat can be anyone. Your vulnerability to the threat depends on several factors such as:
MOTIVATION. How useful access to or
destruction of your network might be to
someone.
TRUST. How well you can trust your authorized
users and/or how well trained are your users
to understand what is acceptable use of the
network and what is not acceptable use,
including the consequences of unacceptable
use.
Vulnerability
Vulnerability essentially is a definition of how well protected your network is from someone outside of your network that attempts to gain access to it; and how well protected your network is from someone within your network intentionally or accidently giving away access or otherwise damaging the network.
Motivation and Trust (see Threat) are two parts of this concern that you will need to assess in your own internal audit of security requirements and policy, later I will describe some references that are available to help you start this process.
UNIX Network Security Architecture
For each of the layers in the UNIX Network Security Architecture (UNIX/NSA) model below, there is a subsection that follows that gives a brief description of that layer and some of the most widely used tools and methods for implementing security controls. I am using the ISO/OSI style of model since most people in the UNIX community are familiar with it. This architecture is specifically based on UNIX Internet connectivity, but it is probably general enough to apply to overall security of any network methodology. One could argue that this model applies to network connectivity in general, with or without the specific focus of UNIX network security.
Layer Name Functional Description
LAYER 7 ;POLICY; POLICY DEFINITION AND DIRECTIVES
LAYER 6 ;PERSONNEL ;PEOPLE WHO USE EQUIPMENT AND DATA
LAYER 5 ;LAN ;COMPUTER EQUIPMENT AND DATA ASSETS
LAYER 4; INTERNAL-DEMARK ;CONCENTRATOR - INTERNAL CONNECT
LAYER 3 ;GATEWAY ;FUNCTIONS FOR OSI 7, 6, 5, 4
LAYER 2 PACKET-FILTER; FUNCTIONS FOR OSI 3, 2, 1
LAYER 1 EXTERNAL-DEMARK ;PUBLIC ACCESS - EXTERNAL CONNECT
The specific aim of this model is to illustrate the relationship between the various high and low level functions that collectively comprise a complete security program for wide-area network connectivity. They are layered in this way to depict
(a) the FIREWALL method of implementing access controls, and
(b) the overall transitive effect of the various layers upon the adjacent layers, lower layers, and the collective model.
The following is a general description of the layers and the nature of the relationship between them. Note that there may be some overlap between the definitions of the various levels, this is most likely between the different layers of the FIREWALL itself (layers 2 and 3).
The highest layer [ 7 - POLICY ] is the umbrella that the entirety of your security program is defined in. It is this function that defines the policies of the organization, including the high level definition of acceptable risk down to the low level directive of what and how to implement equipment and procedures at the lower layers. Without a complete, effective, and implemented policy, your security program cannot be complete.
The next layer [ 6 - PERSONNEL ] defines yet another veil within the bigger umbrella covered by layer 7. The people that install, operate, maintain, use, and can have or do otherwise have access to your network (one way or another) are all part of this layer. This can include people that are not in your organization, that you may not have any administrative control over. Your policy regarding personnel should reflect what your expectations are from your overall security program. Once everything is defined, it is imperitive that personnel are trained and are otherwise informed of your policy, including what is and is not considered acceptable use of the system.
The local-area network layer [ 5 - LAN ] defines the equipment and data assets that your security program is there to protect. It also includes some of the monitor and control procedures used to implement part of your security policy. This is the layer at which your security program starts to become automated electronically, within the LAN assets themselves.
The internal demarkation layer [ 4 - INTERNAL DEMARK ] defines the equipment and the point at which you physically connect the LAN to the FIREWALL that provides the buffer zone between your local- area network (LAN) and your wide-area network (WAN) connectivity. This can take many forms such as a network concentrator that homes both a network interface for the FIREWALL and a network interface for the LAN segment. In this case, the concentrator is the internal demarkation point. The minimum requirement for this layer is that you have a single point of disconnect if the need should arise for you to spontaneosly separate your LAN from your WAN for any reason.
The embedded UNIX gateway layer [ 3 - GATEWAY ] defines the entire platform that homes the network interface coming from your internal demark at layer 4 and the network interface going to your packet filtering router (or other connection equipment) at layer 3. The point of the embedded UNIX gateway is to provide FIREWALL services (as transparent to the user or application as possible) for all WAN services. What this really is must be defined in your policy (refer to layer 1) and illustrates how the upper layers overshadow or are transitive to the layers below. It is intended that the UNIX gateway (or server) at this layer will be dedicated to this role and not otherwise used to provide general network resources (other than the FIREWALL services such as proxy FTP, etc.). It is also used to implement monitor and control functions that provide FIREWALL support for the functions that are defined by the four upper ISO/OSI layers (1-Application, 2-Presentation, 3- Session, 4-Transport). Depending on how this and the device in layer 2 is implemented, some of this might be merely pass-thru to the next level. The configuration of layers 3 and 2 should collectively provide sufficient coverage of all 7 of the functions defined by the ISO/OSI model. This does not mean that your FIREWALL has to be capable of supporting everything possible that fits the OSI model. What this does mean is that your FIREWALL should be capable of supporting all of the functions of the OSI model that you have implemented on your LAN/WAN connectivity.
The packet filtering layer [ 2 - FILTER ] defines the platform that homes the network interface coming from your gateway in layer 3 and the network interface or other device such as synchronous or asynchronous serial communication between your FIREWALL and the WAN connectivity at layer 1. This layer should provide both your physical connectivity to layer 1 and the capability to filter inbound and outbound network datagrams (packets) based upon some sort of criteria (what this criteria needs to be is defined in your policy). This is typically done today by a commercial off-the- shelf intelligent router that has these capabilities, but there are other ways to implement this. Obviously there is OSI link-level activity going on at several layers in this model, not exclusively this layer. But, the point is that functionally, your security policy is implemented at this level to protect the overall link- level access to your LAN (or stated more generally; to separate your LAN from your WAN connectivity).
The external demarkation layer [ LAYER 1 ] defines the point at which you connect to a device, telephone circuit, or other media that you do not have direct control over within your organization. Your policy should address this for many reasons such as the nature and quality of the line or service itself and vulnerability to unauthorized access. At this point (or as part of layer 2) you may even deploy yet another device to perform point to point data link encryption. This is not likely to improve the quality of the line, but certainly can reduce your vulnerability to unauthorized access. You also need to be concerned about the dissemination of things at this level that are often considered miscellaneous, such as phone numbers or circuit IDs.


